Almost no one, not even long-time competitive swimmers, let alone the general public, has actually swum the combat side stroke.
Step-by-step to make the unknown swimming technique your own and get closer to your goal!
Here are six recommended practices that I have put into practice. Please refer to them.
Before we do that, we first want to make sure that…
Step0.How to perform correct streamline

Streamline … basics and fundamentals of swimming.
Streamline is something that anyone can do, and it looks easy, but it is actually very deep.
The first prerequisite for any swimming technique is to be able to do streamline correctly.
Because the key to swimming is “resistance and buoyancy“.
If you are able to streamline correctly, you can swim with less water resistance and make the most of your buoyancy.
If not, however, the swimmer will only expend energy and will not be able to move forward efficiently.
Haste makes waste. First, learn the basics of swimming.
It will make a clear difference in your subsequent progress.
Quite simple, streamline drill on dry land
1.First, lie on your back on the floor.
2.Then, slowly raise both hands above your head, palms together.
That’s all.
Now, let me explain.
“Face angle” and “Core”
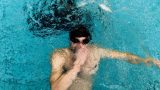
Face angle …The ever-present issue to get out of swimming beginners.
Many beginners tend to look up too much.
Why is that not good? There are two disadvantages to it.
- Raising your face increases water resistance.
- Raising your face makes your legs sink.
The more you raise your face (i.e., lean your head back), the more your head protrudes from the line of your spine.
In a more difficult expression, this means that the frontal projected area increases.
To reduce water resistance, the frontal projected area must be reduced as much as possible.
In fact, we want to avoid sinking legs for the same reason.
Now that’s where ‘lying on your back‘ comes in.
When lying on your back, the line of your head and spine are aligned and your eyes settle right in front of you.
This is actually the ideal posture for minimizing the frontal projected area.
Next, as you raise your hands…
Do you feel a dip in your stomach and a feeling of strength?
This is the state in which the core is switched on.
The legs will sink because they are not supported by the core at the same time as the head rises.
It’s that no one tells you, but the truth is that the basic posture when swimming is always to squeeze your stomach.
The best way (I believe) to develop this sensation is to lying on your back.
Since I developed this practice, my streamline position(ideal streamline with minimal resistance) have improved dramatically.
Most importantly, I like it because I can practice easily without going to the pool.
Can’t I just do it with my back on the wall?
You could do the same exercise with a wall instead of the floor, but standing position is not sufficient to relax the legs.
It is easier to relax your legs when you are lying than standing.
And it is more efficient to lie on the floor to hone the sensation of floating on water.
More details ↓
Step1.Head lead Flutter kick
This is an application of the streamlining acquired in Step0.
The movement of Step1 is simple.
Arms are placed sides of your body, and do flutter kick.
There are three things to check at this point. Face angle, streamline and efficient flutter kick.
1.Face angle
In the lying on your back practiced in Step0, the eyes are directly towards ceiling .
If you practice this in a swimming pool, your eyes should point straight down to the bottom of the pool.
2.Streamline
Now, the face angle is OK, the next step is the stomach.
Keep the stomach draw in and tighten your core just like your hands above your head in step 0, hands to the side of your body.
Now, you’ve got your ideal streamline… next up
3.Efficient flutter kick
The newest concept of flutter kicking: “Twist, don’t kick! “
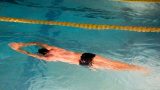
Step2.Side balance
This step is a progress from Step1.
One arm is extended straight overhead, while the other arm put on the side of the body. Continue swimming sideways, facing the poolside.
Be careful not to raise your head too high.
If you lift your head too much because you are worried that you might drink the water, your legs will sink and increase resistance.
Head height should be such that one eye is underwater and one eye is in the air.
Here’s one tip.
If you can’t help but get water in your mouth, try turning your face slightly back (to your feet). Your head will become a wall to block the water, making it easier to breathe. Try it.
And one more point.
Stretch out your hands as far apart as possible from each other.
The lead arm (top arm/hand above the head) is the key to maintaining propulsion, and the pull arm (bottom arm/hand on the body) is the key to maximizing propulsion, so make it a habit.
Then the side kick, in which you keep flutter kick sideways, is a good workout that also makes you aware of the control of your abdominal muscles.
Step3.Side balance & Arm pull
Once you have mastered the side balancing in Step2, add arm motion.
The pull arm (bottom arm) is returned forward, but the hand should always be along the body side, not above the water as in front crawling. The hand is brought forward while continuing to touch from the flank to the chest.
Combat sidestroke emphasizes reducing visibility. Therefore, the elbow is low and the wrist is always below the surface of the water to avoid being noticed by the reflection of the wristwatch. Also, keeping the wrist underwater makes it easier to control splashing.
Once back in the streamline position, arm pulls in a front crawl motion.
This step is an exercise to get used to the arm recovery and arm pull specific to the combat side stroke from the side balance posture.
Step4.Side balance & scissor kick
This step is an exercise to get used to the scissor kick.
※ However, this is not a complete scissor kick.
As we will see later, when all the moves are integrated, this scissor kick is on its way.
Change the side balance flutter kick in step2 to a scissor kick.
The scissor kicking motion is like …
・Open the legs forward and backward with knees bent. (Super Mario jump pose)
・Close the legs at the same time as extending the knees.

Remember, always “the upper leg is in front and the lower leg is behind”.
If the right side of the body is on the upper side, ‘bring the right leg forward and pull the left leg back’.
Step5.Integration of “Steps 3 and 4” from streamline
One step closer to completion.
Now, here comes the compound technique.
Let’s combine hand and leg movements.
Arm pull from streamline to side balance position.
From there, scissor kick back to streamline.
At this time, Ⓐthe pull arm should begin to return (along the body side) and the legs should open forward and backward at about the same time.
Then, Ⓑthe arm is extended forward from the armpit and both legs are extended and closed at the same time.
Now let me explain the annotations in Step 4.
This step is the first time “scissor kick + positional change” is combined together.
“Scissor kick + rolling” would be easier to understand.
In fact, when scissor kick and rolling are combined, the trajectory of the scissor-kick-leg changes from what it was before. The leg motion changes from a linear motion of opening and closing to a “corkscrew” motion of twisting while closing the legs.
Instead of “closing the legs and then rotating the body,” the energy of the leg twist is converted into propulsive force. It is like a ship’s screw. Sorry if I am wrong.
The scissor kick motion practiced in Step 4 is taken to another level here.
Now that you’ve reached here, it’s time to skillfully synchronize the scissor kick and arm recovery timing.
A corkscrew motion is added to the aforementioned Ⓑ.
When the timing is right, you will feel a nice acceleration.
Step6.Lead arm pull
Finally, the last step.
Move the lead arm (hand extended above the head).
The lead arm is a breaststroke pull motion.
1.from streamline, 2.arm pull to side position in crawl motion, 3. lead arm pull to chest in breaststroke motion ← Now we are here(No.3).
And it’s time to match the timing of the kick.
Begin to open the legs at the same time you start the lead arm pull in 3.
Here’s a review once.
The same time to open the legs and start bringing the pull arm back.(step5.Ⓐ)
Here the three movements merge.
・Lead arm pull ・Bring the pull arm back ・Open the legs
These are simultaneous.
Then the pull arm is pulled up to the armpit and the lead arm is pulled to the chest at about the same time.
At this position (at chest), the hands come together and are shot forward . This is the same as the breaststroke recovery.
At the same time, the legs explode propulsion with corkscrews.
Thanks for all your hard work.
Combat side stroke has been completed.
But I would like to say that I have not mentioned ‘breathing‘.
See below for more information on breathing.